2

He visto varias preguntas de estas pero SIEMPRE se han contestado creando un " algo" y a partir de ese "algo" añadir mediante .add las variables que quieres dentro. Pero yo la lista ya está creada porque he usado lo que viene por defecto en Android Studio de "Navigation Drawer", ¿Dónde tengo que poner dentro del código para que cuando pulse en "PRIMERO" me salgan debajo otras dos opciones?

Código java:

public class MainActivity extends AppCompatActivity
        implements NavigationView.OnNavigationItemSelectedListener,FragmentFirst.OnFragmentInteractionListener,
        FragmentSecond.OnFragmentInteractionListener{

@Override
protected void onCreate(Bundle savedInstanceState) {
    super.onCreate(savedInstanceState);
    setContentView(R.layout.activity_main);
    Toolbar toolbar = (Toolbar) findViewById(R.id.toolbar);
    setSupportActionBar(toolbar);

    FloatingActionButton fab = (FloatingActionButton) findViewById(R.id.fab);
    fab.setOnClickListener(new View.OnClickListener() {
        @Override
        public void onClick(View view) {
            Snackbar.make(view, "Replace with your own action", Snackbar.LENGTH_LONG)
                    .setAction("Action", null).show();
        }
    });

    DrawerLayout drawer = (DrawerLayout) findViewById(R.id.drawer_layout);

    ActionBarDrawerToggle toggle = new ActionBarDrawerToggle(
            this, drawer, toolbar, R.string.navigation_drawer_open, R.string.navigation_drawer_close);
    drawer.addDrawerListener(toggle);
    toggle.syncState();

    NavigationView navigationView = (NavigationView) findViewById(R.id.nav_view);
    navigationView.setNavigationItemSelectedListener(this);
}

@Override
public void onBackPressed() {
    DrawerLayout drawer = (DrawerLayout) findViewById(R.id.drawer_layout);
    if (drawer.isDrawerOpen(GravityCompat.START)) {
        drawer.closeDrawer(GravityCompat.START);
    } else {
        super.onBackPressed();
    }
}

@Override
public boolean onCreateOptionsMenu(Menu menu) {
    // Inflate the menu; this adds items to the action bar if it is present.
    getMenuInflater().inflate(R.menu.main, menu);
    return true;
}

@Override
public boolean onOptionsItemSelected(MenuItem item) {
    // Handle action bar item clicks here. The action bar will
    // automatically handle clicks on the Home/Up button, so long
    // as you specify a parent activity in AndroidManifest.xml.
    int id = item.getItemId();


    //noinspection SimplifiableIfStatement
    if (id == R.id.action_settings) {
        return true;
    }

    return super.onOptionsItemSelected(item);
}

@SuppressWarnings("StatementWithEmptyBody")
@Override
public boolean onNavigationItemSelected(MenuItem item) {
    // Handle navigation view item clicks here.
    int id = item.getItemId();

    boolean FragmentTransaction = false;
    Fragment fragment = null;

    if (id == R.id.PRIMERO) {

        fragment = new FragmentFirst();
        FragmentTransaction = true;
    } else if (id == R.id.SEGUNDO) {

        fragment = new FragmentSecond();
        FragmentTransaction = true;


    } else if (id == R.id.TERCERO) {

    } else if (id == R.id.CUARTO) {

    } else if (id == R.id.nav_share) {

    } else if (id == R.id.nav_send) {

    }

    if(FragmentTransaction) {
        getSupportFragmentManager().beginTransaction()
                .replace(R.id.content_main,fragment)
                .commit();
    }

    DrawerLayout drawer = (DrawerLayout) findViewById(R.id.drawer_layout);
    drawer.closeDrawer(GravityCompat.START);
    return true;
}

@Override
public void onFragmentInteraction(Uri uri) {

}

}


codigo main :

<include
    layout="@layout/app_bar_main"
    android:layout_width="match_parent"
    android:layout_height="match_parent" />

<android.support.design.widget.NavigationView
    android:id="@+id/nav_view"
    android:layout_width="wrap_content"
    android:layout_height="match_parent"
    android:layout_gravity="start"
    android:fitsSystemWindows="true"
    app:headerLayout="@layout/nav_header_main"
    app:menu="@menu/activity_main_drawer" />
1
  • Lo que comentas como "PRIMERO" es un grupo al cual se le agregan elementos, te agrego una respuesta con un ejemplo en el cual se configuran 3 grupos con sus respectivos elementos.
    – Jorgesys
    Commented el 11 ago. 2016 a las 19:02

2 respuestas 2

1

Te recomiendo utilizar una librería como estas:

https://github.com/AAkira/ExpandableLayout

https://github.com/traex/ExpandableLayout

Lo utilizaria de esta manera:

<android.support.v4.widget.DrawerLayout xmlns:android="http://schemas.android.com/apk/res/android" xmlns:tools="http://schemas.android.com/tools"
xmlns:app="http://schemas.android.com/apk/res-auto"
android:id="@+id/drawer_layout"
android:layout_width="match_parent"
android:layout_height="match_parent"
tools:context=".activities.MainActivity">

<RelativeLayout
    android:id="@+id/content"
    android:layout_width="match_parent"
    android:layout_height="match_parent">

    <include
        android:id="@+id/toolbar"
        layout="@layout/toolbar">
    </include>

    <ImageView
        android:id="@+id/fab_normal"
        android:layout_width="56dp"
        android:layout_height="56dp"
        android:layout_alignParentEnd="true"
        android:layout_alignParentRight="true"
        android:layout_below="@+id/toolbar"
        android:layout_marginEnd="@dimen/activity_horizontal_margin"
        android:layout_marginRight="@dimen/activity_horizontal_margin"
        android:layout_marginTop="-28dp"
        android:elevation="8dp"
        android:stateListAnimator="@anim/fab_anim"
        android:transitionName="fab"
        android:visibility="visible"
        android:adjustViewBounds="true"
        android:padding="0dp"
        android:src="@drawable/android"
        android:scaleType="centerInside"/>

    <FrameLayout
        android:id="@+id/fragment_container_base"
        android:layout_width="match_parent"
        android:layout_height="match_parent"
        android:layout_below="@+id/toolbar">

        <LinearLayout
            android:layout_width="match_parent"
            android:layout_height="match_parent"
            android:orientation="vertical">

            <FrameLayout
                android:id="@+id/contenedor"
                android:layout_width="match_parent"
                android:layout_height="0dp"
                android:layout_weight="9"/>
        </LinearLayout>
    </FrameLayout>
</RelativeLayout>

<LinearLayout
    android:id="@+id/left_drawer"
    android:layout_width="240dp"
    android:layout_height="match_parent"
    android:layout_gravity="start"
    android:orientation="vertical"
    android:background="@color/text">

    <LinearLayout
        android:id="@+id/lyPanel"
        android:layout_width="match_parent"
        android:layout_height="match_parent"
        android:orientation="vertical">

        <com.github.aakira.expandablelayout.ExpandableRelativeLayout
        android:id="@+id/expandableLayout"
        android:layout_width="match_parent"
        android:layout_height="match_parent"
        app:ael_expanded="false"
        app:ael_duration="500"
        app:ael_interpolator="bounce"
        app:ael_orientation="vertical">

<TextView
    android:id="@+id/text"
    android:layout_width="match_parent"
    android:layout_height="wrap_content"
    android:text="sample" />
<TextView
    android:layout_width="match_parent"
    android:layout_height="wrap_content"
    android:layout_below="@id/text"
    android:text="sample2" />

1
  • Bienvenidor a la comunidad, se ve interesantes esas librerías, sobretodo la primera
    – Codelaby
    Commented el 12 ago. 2016 a las 9:59
1

Agregar un ExpandableListView a un Navigation Drawer, se puede realizar agregando el elemento dentro del DrawerLayout por ejemplo: activity_main.xml :

<android.support.v4.widget.DrawerLayout
    xmlns:android="http://schemas.android.com/apk/res/android"
    android:id="@+id/drawer_layout"
    android:layout_width="match_parent"
    android:layout_height="match_parent">

    <FrameLayout
        android:id="@+id/content_frame"
        android:layout_width="match_parent"
        android:layout_height="match_parent" />

    <ExpandableListView
        android:id="@+id/expandable_list"
        android:layout_width="240dp"
        android:layout_height="match_parent"
        android:layout_gravity="start"
        android:choiceMode="singleChoice"
        android:divider="@android:color/transparent"
        android:dividerHeight="0dp"
        android:background="#ffff"/>

</android.support.v4.widget.DrawerLayout>

Agrego la Activity para que cargaria el layout activity_main.xml:

public class MainActivity extends AppCompatActivity {

    private DrawerLayout mDrawerLayout;
    private ExpandableListView expListView;
    private ActionBarDrawerToggle mDrawerToggle;
    ExpandableListAdapter listAdapterExpandable;
    List<String> listDataHeader;
    HashMap<String, List<String>> listDataChild;

    @Override
    protected void onCreate(Bundle savedInstanceState) {
        super.onCreate(savedInstanceState);
        setContentView(R.layout.activity_main);
        // obtiene el DrawerLayout.
        mDrawerLayout = (DrawerLayout) findViewById(R.id.drawer_layout);
        // obtiene el listview.
        expListView = (ExpandableListView) findViewById(R.id.expandable_list);
        // prepara datos para Header y Listado en ExpandableListView.
        prepareListData();
        // configura Adapter.
        listAdapterExpandable = new ExpandableListAdapter(this, listDataHeader, listDataChild);
        // configura Adapter en ExpandableListView.
        expListView.setAdapter(listAdapterExpandable);
        // Puedes expandir los grupos por default.
        int count = listAdapterExpandable.getGroupCount();
        for ( int i = 0; i < count; i++ )
            expListView.expandGroup(i);


    }


    private void prepareListData() {
        listDataHeader = new ArrayList<String>();
        listDataChild = new HashMap<String, List<String>>();

        // Agrega Encabezados.
        listDataHeader.add("Lenguajes de Programación");
        listDataHeader.add("Tipos");
        listDataHeader.add("Paises");

        // Agrega datos.
        List<String> lenguajes = new ArrayList<String>();
        lenguajes.add("C++");
        lenguajes.add("Java");
        lenguajes.add("Ruby");
        lenguajes.add("Python");
        lenguajes.add("Swift");
        lenguajes.add("Objective C");
        lenguajes.add("C#");

        // Agrega datos.
        List<String> tipos = new ArrayList<String>();
        tipos.add("Desarrollo Mobil");
        tipos.add("Escritorio");
        tipos.add("Web");
        tipos.add("Juegos");
        tipos.add("Bases de Datos");
        tipos.add("Analisis de Datos");

        // Agrega datos.
        List<String> paises = new ArrayList<String>();
        paises.add("Rumania");
        paises.add("Ucrania");
        paises.add("México");
        paises.add("Grecia");
        paises.add("Holanda");
        paises.add("El Salvador");
        paises.add("Guatemala");
        paises.add("Canada");
        paises.add("Francia");

        listDataChild.put(listDataHeader.get(0), lenguajes);
        listDataChild.put(listDataHeader.get(1), tipos);
        listDataChild.put(listDataHeader.get(2), paises);
    }

}

Custom view para el grupo: list_group.xml :

<?xml version="1.0" encoding="utf-8"?>
<LinearLayout xmlns:android="http://schemas.android.com/apk/res/android"
    android:layout_width="fill_parent"
    android:layout_height="wrap_content"
    android:orientation="vertical"
    android:padding="5dp"
    android:background="#000000">

    <TextView
        android:id="@+id/lblListHeader"
        android:layout_width="fill_parent"
        android:layout_height="wrap_content"
        android:paddingLeft="?android:attr/expandableListPreferredItemPaddingLeft"
        android:textSize="15dp"
        android:textColor="#FF9900" />

</LinearLayout>

Custom view de cada elemento: list_item.xml :

<?xml version="1.0" encoding="utf-8"?>
<LinearLayout xmlns:android="http://schemas.android.com/apk/res/android"
    android:layout_width="match_parent"
    android:layout_height="55dip"
    android:orientation="vertical" >

    <TextView
        android:id="@+id/lblListItem"
        android:layout_width="fill_parent"
        android:layout_height="wrap_content"
        android:textSize="15dip"
        android:paddingTop="5dp"
        android:paddingBottom="5dp"
        android:paddingLeft="?android:attr/expandableListPreferredChildPaddingLeft" />

</LinearLayout>

se agrega clase personalizada ExpandableListAdapter que extiende de BaseExpandableListAdapter :

    import java.util.HashMap;
    import java.util.List;
    import android.content.Context;
    import android.graphics.Typeface;
    import android.view.LayoutInflater;
    import android.view.View;
    import android.view.ViewGroup;
    import android.widget.BaseExpandableListAdapter;
    import android.widget.TextView;

public class ExpandableListAdapter extends BaseExpandableListAdapter {

    private Context context;
    private List<String> miListDataHeader; // Titulos en encabezados.
    private HashMap<String, List<String>> miListDataChild;

    public ExpandableListAdapter(Context context, List<String> listDataHeader,
                                 HashMap<String, List<String>> listChildData) {
        this.context = context;
        this.miListDataHeader = listDataHeader;
        this.miListDataChild = listChildData;
    }

    @Override
    public Object getChild(int groupPosition, int childPosititon) {
        return this.miListDataChild.get(this.miListDataHeader.get(groupPosition))
                .get(childPosititon);
    }

    @Override
    public long getChildId(int groupPosition, int childPosition) {
        return childPosition;
    }

    @Override
    public View getChildView(int groupPosition, final int childPosition,
                             boolean isLastChild, View convertView, ViewGroup parent) {
        final String childText = (String) getChild(groupPosition, childPosition);
        if (convertView == null) {
            LayoutInflater infalInflater = (LayoutInflater) this.context
                    .getSystemService(Context.LAYOUT_INFLATER_SERVICE);
            convertView = infalInflater.inflate(R.layout.list_item, null);
        }
        TextView txtListChild = (TextView) convertView.findViewById(R.id.lblListItem);
        txtListChild.setText(childText);
        return convertView;
    }

    @Override
    public int getChildrenCount(int groupPosition) {
        return this.miListDataChild.get(this.miListDataHeader.get(groupPosition)).size();
    }

    @Override
    public Object getGroup(int groupPosition) {
        return this.miListDataHeader.get(groupPosition);
    }

    @Override
    public int getGroupCount() {
        return this.miListDataHeader.size();
    }

    @Override
    public long getGroupId(int groupPosition) {
        return groupPosition;
    }

    @Override
    public View getGroupView(int groupPosition, boolean isExpanded,
                             View convertView, ViewGroup parent) {
        String headerTitle = (String) getGroup(groupPosition);
        if (convertView == null) {
            LayoutInflater infalInflater = (LayoutInflater) this.context
                    .getSystemService(Context.LAYOUT_INFLATER_SERVICE);
            convertView = infalInflater.inflate(R.layout.list_group, null);
        }

        TextView lblListHeader = (TextView) convertView.findViewById(R.id.lblListHeader);
        lblListHeader.setTypeface(null, Typeface.BOLD);
        lblListHeader.setText(headerTitle);

        return convertView;
    }

    @Override
    public boolean hasStableIds() {
        return false;
    }

    @Override
    public boolean isChildSelectable(int groupPosition, int childPosition) {
        return true;
    }
}

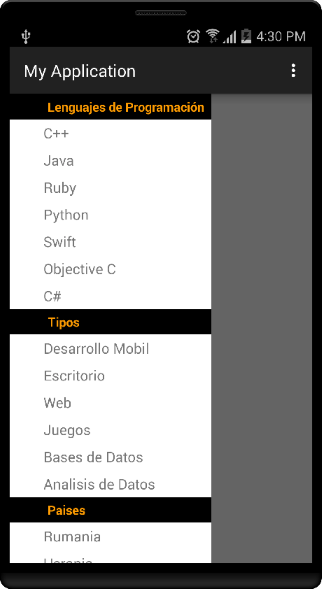
Este es un ejemplo de como se vería la implementación:

introducir la descripción de la imagen aquí

10
  • Voy a tal cual probarlo pero no me queda igual de elegante que si uso un drawer..
    – Rf Mvs
    Commented el 11 ago. 2016 a las 23:13
  • a que te refieres que no queda igual de elegante? al diseño?
    – Jorgesys
    Commented el 11 ago. 2016 a las 23:19
  • Sí, voy a ver porque me da error, cuando se me ejecute te aviso.
    – Rf Mvs
    Commented el 11 ago. 2016 a las 23:23
  • ok , simplemente revisa el LogCat ahí encontraras que es el problema.
    – Jorgesys
    Commented el 11 ago. 2016 a las 23:30
  • me sale unico fallo en "ActionBarDrawerToggle" y cuando doy en importar import me sale el "import android.support.v4.app.ActionBarDrawerToggle" y me sale error en casi todo en el MainActivity
    – Rf Mvs
    Commented el 11 ago. 2016 a las 23:33

Tu Respuesta

By clicking “Publica tu respuesta”, you agree to our terms of service and acknowledge you have read our privacy policy.

¿No es la respuesta que buscas? Examina otras preguntas con la etiqueta o formula tu propia pregunta.