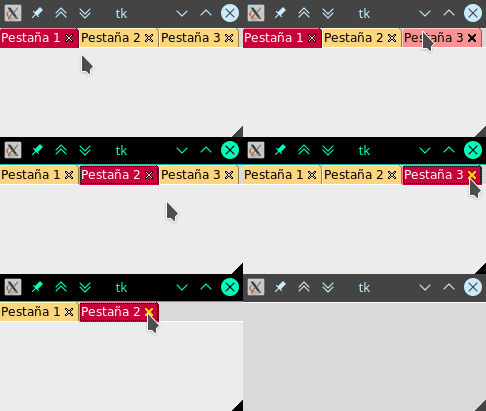
Puedes definir tu propio estilo y especificar el color que debe tener la pestaña seleccionada. Un ejemplo.
import tkinter
from tkinter import ttk


root = tkinter.Tk()

style = ttk.Style()
settings = {"TNotebook.Tab": {"configure": {"padding": [5, 1],
                                            "background": "#fdd57e"
                                           },
                              "map": {"background": [("selected", "#C70039"),
                                                     ("active", "#fc9292")],
                                      "foreground": [("selected", "#ffffff"),
                                                     ("active", "#000000")]

                                     }
                              }
           }


style.theme_create("mi_estilo", parent="alt", settings=settings)
style.theme_use("mi_estilo")


nb = ttk.Notebook(width=200, height=200)
nb.pressed_index = None
f1 = tkinter.Frame(nb)
f2 = tkinter.Frame(nb)
f3 = tkinter.Frame(nb)
nb.add(f1, text='Pestaña 1')
nb.add(f2, text='Pestaña 2')
nb.add(f3, text='Pestaña 3')
nb.pack(expand=1, fill='both')
root.mainloop()

No obstante, no es posible definir estas propiedades para una pestaña individualmente, al menos yo no conozco ninguna forma de hacerlo. Si quieres que cada pestaña tenga un color distinto al ser seleccionada, lo que se puede hacer es usar el evento <<NotebookTabChanged>> y modificar el estilo de forma dinámica cada vez que se seleccione una nueva pestaña. Hay muchas formas de hacerlo, por ejemplo:
import tkinter
from tkinter import ttk


root = tkinter.Tk()

style = ttk.Style()
settings = {"TNotebook.Tab": {"configure": {"padding": [5, 1],
                                            "background": "#fdd57e"
                                            }}}
style.theme_create("mi_estilo", parent="alt", settings=settings)
style.theme_use("mi_estilo")


def on_tab(event):
    global tab_styles
    global style
    nb = event.widget
    tab = nb.tab(nb.select(), "text")
    st = tab_styles[tab]
    style.map('TNotebook.Tab', **st)

tab_styles = {}
nb = ttk.Notebook(width=200, height=200)
nb.pressed_index = None

f1 = tkinter.Frame(nb, background="red")
f2 = tkinter.Frame(nb, background="green")
f3 = tkinter.Frame(nb, background="blue")

nb.add(f1, text="Rojo")
tab_styles["Rojo"] = {"background": [("selected", "red")],
                      "foreground": [("selected", "#ffffff")]
                     }
nb.add(f2, text="Verde")
tab_styles["Verde"] = {"background": [("selected", "green")],
                      "foreground": [("selected", "#ffffff")]
                     }

nb.add(f3, text="Azul")
tab_styles["Azul"] = {"background": [("selected", "blue")],
                      "foreground": [("selected", "#ffffff")]
                     }

nb.pack(expand=1, fill='both')
nb.bind("<<NotebookTabChanged>>", on_tab)


root.mainloop()

Edición
Si creas tu propio widget derivando de ttk.Notebook, el estilo de las pestañas se aplica igual, solo que usar el nombre correcto de nuestro widgets:
 style.map('ButtonNotebook.Tab', background = [("selected", "#C70039"),
                                               ("active", "#fc9292")],
                                 foreground = [("selected", "#ffffff"),
                                               ("active", "#000000")]
                 )
Un ejemplo completo con un botón de cierre en las pestañas, usando una imágen, y aplicando el estilo personalizado para el fondo de las mismas usado anteriormente:
import sys
import tkinter as tk
from tkinter import ttk


class ButtonNotebook(ttk.Notebook):
    _initialized = False

    def __init__(self, *args, **kwargs):
        if not self._initialized:
            self._initialize()
            self._inititialized = True

        kwargs["style"] = "ButtonNotebook"
        super().__init__(*args, **kwargs)
        self._active = None

        self.bind("<ButtonPress-1>", self.on_tab_close_press, True)
        self.bind("<ButtonRelease-1>", self.on_tab_close_release)

    def on_tab_close_press(self, event):
        name = self.identify(event.x, event.y)
        if name == "tab_btn_close":
            index = self.index("@%d,%d" % (event.x, event.y))
            self.state(['pressed'])
            self._active = index

    def on_tab_close_release(self, event):
        if not self.instate(['pressed']):
            return None

        name =  self.identify(event.x, event.y)

        if name == "tab_btn_close":
            index = self.index("@%d,%d" % (event.x, event.y))
            if self._active == index:
                self.forget(index)
                self.event_generate("<<NotebookTabClosed>>")

        self.state(["!pressed"])
        self._active = None

    def _initialize(self):
        style = ttk.Style()
        if sys.platform == "win32":
            style.theme_use('winnative')

        self.images = (
            tk.PhotoImage("img_close", data='''
                          R0lGODlhCAAIAMIEAAAAAP/SAP/bNNnZ2f///////////////yH5
                          BAEKAAIALAAAAAAIAAgAAAMUCCAsCmO5OBVl8OKhoV3e9jQOkAAAOw==
                           '''),
            tk.PhotoImage("img_closeactive", data='''
                          R0lGODlhCAAIAMIEAAAAAP/SAP/bNNnZ2f///////////////yH5
                          BAEKAAMALAAAAAAIAAgAAAMPCDA8+gw+GGlVbWKqmwMJADs=
                          ''' ),
            tk.PhotoImage("img_closepressed", data='''
                          R0lGODlhCAAIAMIEAAAAAP/SAP/bNNnZ2f///////////////yH5B
                          AEKAAMALAAAAAAIAAgAAAMPGDE8+gw+GGlVbWKqmwsJADs=
                          ''')
        )

        style.element_create("tab_btn_close", "image", "img_close",
                            ("active", "pressed", "!disabled", "img_closepressed"),
                            ("active", "!disabled", "img_closeactive"), border=8, sticky='')

        style.layout("ButtonNotebook", [("ButtonNotebook.client", {"sticky": "nswe"})])
        style.layout("ButtonNotebook.Tab", [
            ("ButtonNotebook.tab", {
                "sticky": "nswe",
                "children": [
                    ("ButtonNotebook.padding", {
                        "side": "top",
                        "sticky": "nswe",
                        "children": [
                            ("ButtonNotebook.focus", {
                                "side": "top",
                                "sticky": "nswe",
                                "children": [
                                    ("ButtonNotebook.label", {"side": "left", "sticky": ''}),
                                    ("ButtonNotebook.tab_btn_close", {"side": "left", "sticky": ''}),
                                ]
                            })
                        ]
                    })
                ]
            })
        ])

        style.configure("ButtonNotebook.Tab", background="#fdd57e")
        style.map('ButtonNotebook.Tab', background = [("selected", "#C70039"),
                                                      ("active", "#fc9292")],
                                        foreground = [("selected", "#ffffff"),
                                                      ("active", "#000000")]
                 )

if __name__ == "__main__":
    root = tk.Tk()
    nb = ButtonNotebook(width=200, height=200)
    nb.pressed_index = None
    f1 = tk.Frame(nb)
    f2 = tk.Frame(nb)
    f3 = tk.Frame(nb)
    nb.add(f1, text='Pestaña 1')
    nb.add(f2, text='Pestaña 2')
    nb.add(f3, text='Pestaña 3')
    nb.pack(expand=1, fill='both')
    root.mainloop()

Este ejemplo está inspirado en esta respuesta de Bryan Oakley en el sitio en inglés.
Nota: las imágenes son .gif de 8 bits con un tamaño de 8 x 8 pixeles codificados en Base64. Se pueden cargar desde otra fuente, como un archivo, igual que hariamos con una imágen cualquiera.


